Services Test Online
Contents
- 1. Introduction
- 2. General system description
- 2.1. Main window
- 2.2. Commands
- 2.3. Map
- 2.4. Graphic navigation bar
- 2.5. Precise navigation bar
- 2.6. Sequence display area
- 2.7. Information panels
- 2.8. Uploading data to user's profile on a server
- 2.9. Loading data from the public profile to a personal profile
- 2.10. Downloading data to a local drive
- 2.11. Opening a locus in applet
- 2.12. List of opened loci
- 2.13. Closing a locus
- 2.14. Selecting a feature's type for editing
- 2.15. Selecting a feature's type for viewing
- 2.16. Selecting features' types for loading and their display order
- 2.17. Searching for feature
- 2.18. Searching for genes
- 2.19. Searching for motifs
- 2.20. Searching for alignments
-
2.21. Genomes comparison
- 2.21.1. Main window
- 2.21.2. Main menu commands and toolbar buttons functionality
- 2.21.3. Graphic navigation bar
- 2.21.4. Map
- 2.21.4.1. Graphical alignment representation
- 2.21.5. Information bar
- 2.21.6 Status bar
- 2.21.7 Selecting objects for comparison
- 2.21.7.1. Genomes comparison
- 2.21.7.2. Genome to sequence comparison
- 2.21.7.3. Two sequences comparison
- Application parameters
- 2.23. Font selection dialog
- 2.24. Color selection dialog
- Selecting the genome of user's interest;
- Simultaneous work with several genomes;
- Visual evaluation of available information on genomes;
- Comparing genomes with use of built-in "Genome comparison browser";
- Translation of features into peptide sequences;
- Retrieving the information on features and their types;
- Search for sequences in different genome regions;
- Aligning sequences with use of Fmap and Scan2 programs, and visualizing results;
- Search for genes;
- Downloading loci onto a local disk or in browser in Genbank or FgenesB-Annotator formats.
1. Introduction
Softberry Bacterial Genome Explorer provides the visual representation of bacterial genomes and possibility to work with several genomes simultaneously.
The "Types of features" term is used to define the types of objects, such as operons, promoters, terminators etc, that are located on a genomic sequence. The "Feature" term refers to a certain object of appropriate type that is located on a genomic sequence. For example, if we consider the operon with ID 51 that is located in Methanococcus jannaschii genome in positions from 178420 to 181153, then this certain operon is referred to as "Feature", and type of this "feature" is "operon".
Since several features of the same type may be located in one genome region (i.e. these features are overlapping), then for more convenience they are represented in several layers, one over another.
-
Genome Explorer provides the following functionality:
Softberry Genome Explorer has a wide set of navigation and search features that are adopted to specific of application area and user's requirements.
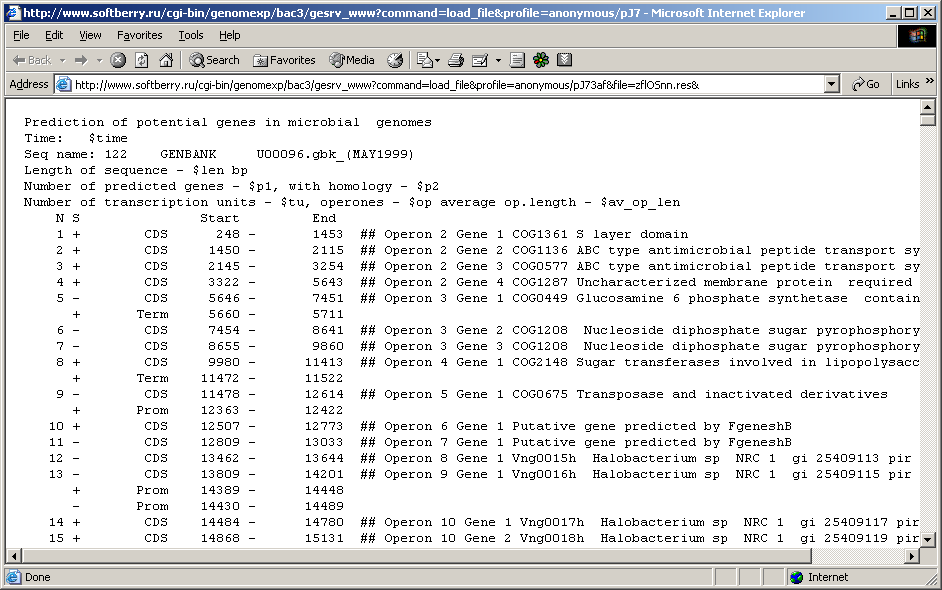
1.1. Explanation of Fgenesb_annotator output
Example of FGENESB output:
Prediction of potential genes in microbial genomes
Time: Tue Aug 22 11:21:15 2006
Seq name: gi|15807672|ref|NC_001264.1| Deinococcus radiodurans R1 (partial sequence)
Length of sequence - 54865 bp
Number of predicted genes - 48, with homology - 48
Number of transcription units - 18, operons - 13 average op.length - 3.3
N Tu/Op Conserved S Start End Score
pairs(N/Pv)
- TRNA 147 - 222 78.9 # Arg CCG 0 0
+ TRNA 315 - 398 63.6 # Leu TAG 0 0
+ 5S_RRNA 521 - 637 100.0 # AB001721 [D:2735..2851]
+ SSU_RRNA 698 - 2181 100.0 # SSU_RRNA ##
+ LSU_RRNA 2302 - 5345 100.0 # BX248583 [R:613128..616171]
+ Prom 5304 - 5363 41.4
1 1 Op 1 22/0.000 + CDS 5410 - 6300 498 ## COG1192 ATPases involved �
2 1 Op 2 . + CDS 6297 - 7178 502 ## COG1475 Predicted �
+ Term 7203 - 7253 9.1
- Term 7191 - 7241 14.2
3 2 Tu 1 . - CDS 7283 - 8746 909 ## COG1012 NAD-dependent �
- Prom 8792 - 8851 2.8
4 3 Tu 1 . + CDS 8802 - 9533 302 ## COG2068 Uncharacterized �
+ Term 9779 - 9818 3.8
- Term 9527 - 9567 9.0
5 4 Op 1 2/0.125 - CDS 9584 - 10762 1005 ## COG1063 Threonine �
6 4 Op 2 . - CDS 10759 - 11457 666 ## COG5637 Predicted integral �
- Prom 11697 - 11756 2.4
7 5 Op 1 37/0.000 + CDS 11704 - 12609 872 ## COG1131 ABC-type multidrug �
8 5 Op 2 5/0.000 + CDS 12726 - 13517 812 ## COG0842 ABC-type multidrug �
9 5 Op 3 15/0.000 + CDS 13674 - 14684 1028 ## COG4585 Signal transduction �
10 5 Op 4 . + CDS 14681 - 15316 506 ## COG2197 Response regulator �
�
47 18 Op 1 . - CDS 53783 - 54703 431 ## DRA0045 hypothetical �
48 18 Op 2 . - CDS 54700 - 54864 91 ## DRA0046 hypothetical �
Predicted protein(s)
>gi|15807672|ref|NC_001264.1| GENE 1 5410 - 6300 498 296 aa, chain + ## HITS:3
COG:DRA0001 KEGG:FRAAL2247 NR:6460595 ## COG: DRA0001 COG1192 #
Protein_GI_number: 15807673 # Func_class: D Cell cycle control, cell division, chromosome
partitioning # Function: ATPases involved in chromosome partitioning # Organism: Deinococcus
radiodurans # 37 296 1 260 260 459 100.0 1e-129 ## KEGG: FRAAL2247 #
Name: not_defined # Def: chromosome partitioning protein (partial match) [EC:2.7.10.2] #
Organism: F.alni # Pathway: not_defined # 48 283 50 291 302 118 35.0 5e-26 ##
NR: gi|6460595|gb|AAF12301.1| chromosome partitioning ATPase, putative, ParA family
[Deinococcus radiodurans R1]^Agi|15807673|ref|NP_285325.1| chromosome partitioning ATPase, putative,
ParA family [Deinococcus radiodurans R1] # 37 296 1 260 260 459 100.0 1e-128
VLKNHLFLRNLIFSVLPVVQHFLTFKEEQSIADLSDMVSAVKTLTVFNHAGGAGKTSLTL
NVGYELARGGLRVLLLDLDPQANLTGWLGISGVTREMTVYPVAVDGQPLPSPVKAFGLDV
IPAHVSLAVAEGQMMGRVGAQGRLRRALAEVSGDYDVALIDSPPSLGQLAILAALAADQM
IVPVPTRQKGLDALPGLQGALTEYREVRPDLTVALYVPTFYDARRRHDQEVLADLKAHLS
PLARPVPQREAVWLDSTAQGAPVSEYAPGTPVHADVQRLTADIAAAIGVAYPGENA
>gi|15807672|ref|NC_001264.1| GENE 2 6297 - 7178 502 293 aa, chain + ## HITS:3
COG:DRA0002 KEGG:SAR11_0354 NR:12230476 ## COG: DRA0002 COG1475 #
Protein_GI_number: 15807674 # Func_class: K Transcription # Function: Predicted transcriptional
regulators # Organism: Deinococcus radiodurans # 1 293 1 293 293 478 100.0
1e-135 ## KEGG: SAR11_0354 # Name: parB # Def: chromosome partitioning protein [EC:2.7.7.-] #
Organism: P.ubique # Pathway: not_defined # 10 200 12 177 282 107 36.0 7e-23 ##
NR: gi|12230476|sp|Q9RZE7|PARB2_DEIRA Probable chromosome 2 partitioning protein parB
(Probable chromosome II partitioning protein parB)^Agi|6460594|gb|AAF12300.1| chromosome partitioning
protein, ParB family [Deinococcus radiodurans R1]^Agi|15807674|ref|NP_285326.1| chromosome partitioning
protein, ParB family [Deinococcus radiodurans R1] # 1 293 1 293 293 478 100.0
1e-133
MTRRRPERRRDLLGLLGETPVDLSQANDIRALPVNELKVGSTQPRRSFDLERLSELAESI
RAHGVLQPLLVRSVDGQYEIVAGERRWRAAQLAGLAEVPVVVRQLSNEQARAAALIENLQ
RDNLNVIDEVDGKLELIALTLGLEREEARKRLMQLLRAVPGDEHEQLDQVFRSMGETWRT
FAKNKLRILNWPQPVLEALRAGLPLTLGSVVASAPPERQAELLKLAQNGASRSQLLQALQ
TPSQTSAVTPEHFAKVLSSKRFLSGLDTPTREALDRWLARMPERVRQAIDEQS
...
Example of FGENESB output in GenBank format (scripts run_tgb.pl, togenbank.pl):
     gene            complement(147..222)
                     /gene="Arg CCG"
     tRNA            complement(147..222)
                     /gene="Arg CCG"
                     /product="tRNA-Arg"
                     /note="Arg CCG 0 0"
     gene            315..398
                     /gene="Leu TAG"
     tRNA            315..398
                     /gene="Leu TAG"
                     /product="tRNA-Leu"
                     /note="Leu TAG 0 0"
     gene            521..637
                     /gene="AB001721 [D:2735..2851]"
     rRNA            521..637
                     /gene="AB001721 [D:2735..2851]"
                     /product="5S ribosomal RNA"
                     /note="AB001721 [D:2735..2851]"
     gene            698..2181
                     /gene="SSU_RRNA"
     rRNA            698..2181
                     /gene="SSU_RRNA"
                     /product="16S ribosomal RNA"
                     /note="SSU_RRNA"
     gene            2302..5345
                     /gene="BX248583 [R:613128..616171]"
     rRNA            2302..5345
                     /gene="BX248583 [R:613128..616171]"
                     /product="23S ribosomal RNA"
                     /note="BX248583 [R:613128..616171]"
     promoter        5304..5363
     CDS             5410..6300
                     /function="ATPases involved in chromosome partitioning"
                     /note="Operon 1 Gene 1 COG1192 ATPases involved in
                     chromosome partitioning"
                     /translation="VLKNHLFLRNLIFSVLPVVQHFLTFKEEQSIADLSDMVSAVKTL
                     TVFNHAGGAGKTSLTLNVGYELARGGLRVLLLDLDPQANLTGWLGISGVTREMTVYPV
                     AVDGQPLPSPVKAFGLDVIPAHVSLAVAEGQMMGRVGAQGRLRRALAEVSGDYDVALI
                     DSPPSLGQLAILAALAADQMIVPVPTRQKGLDALPGLQGALTEYREVRPDLTVALYVP
                     TFYDARRRHDQEVLADLKAHLSPLARPVPQREAVWLDSTAQGAPVSEYAPGTPVHADV
                     QRLTADIAAAIGVAYPGENA"
                     /transl_table=11
     CDS             6297..7178
                     /function="Predicted transcriptional regulators"
                     /note="Operon 1 Gene 2 COG1475 Predicted transcriptional
                     regulators"
                     /translation="MTRRRPERRRDLLGLLGETPVDLSQANDIRALPVNELKVGSTQP
                     RRSFDLERLSELAESIRAHGVLQPLLVRSVDGQYEIVAGERRWRAAQLAGLAEVPVVV
                     RQLSNEQARAAALIENLQRDNLNVIDEVDGKLELIALTLGLEREEARKRLMQLLRAVP
                     GDEHEQLDQVFRSMGETWRTFAKNKLRILNWPQPVLEALRAGLPLTLGSVVASAPPER
                     QAELLKLAQNGASRSQLLQALQTPSQTSAVTPEHFAKVLSSKRFLSGLDTPTREALDR
                     WLARMPERVRQAIDEQS"
                     /transl_table=11
     terminator      7203..7253
     terminator      complement(7191..7241)
     CDS             complement(7283..8746)
                     /function="NAD-dependent aldehyde dehydrogenases"
                     /note="Operon 2 Gene 1 COG1012 NAD-dependent aldehyde
                     dehydrogenases"
                     /translation="MTTTDLRTTYSSVTRSQAYFDGEWRNAPRNFEVRHPGNGEVIGE
                     VADCTPTDARQAIDAAEVALREWRQVNPYERGKILRRWHDLMFEHKEELAQLMTLEMG
                     KPISETRGEVHYAASFIEWCAEEAGRIAGERINLRFPHKRGLTISEPVGIVYAVTPWN
                     FPAGMITRKAAPALAAGCVMILKPAELSPMTALYLTELWLKAGGPANTFQVLPTNDAS
                     ALTQPFMNDSRVRKLTFTGSTEVGRLLYQQAAGTIKRVSLELGGHAPFLVFDDADLER
                     AASEVVASKFRNSGQTCVCTNRVYVQRGVAEEFIRLLTEKTAALQLGDPFDEATQVGP
                     VVEQAGLDKVQRQVQDALTKGAQATTGGQVSSGLFFQPTVLVDVAPDSLILREETFGP
                     VAPVTIFDTEEEGLRLANDSEYGLAAYAYTRDLGRAFRIAEGLEYGIVGINDGLPSSA
                     APHVPFGGMKNSGVGREGGHWGLEEYLETKFVSLGLS"
                     /transl_table=11
     promoter        complement(8792..8851)

...

BASE COUNT     11009 a   16099 c   16880 g   10877 t
ORIGIN
        1 tctttgctcg ccatacccaa agtctacacg ctgattttca cgtttccaga ccctgccctc
       61 tcgctactca gctctccaag tttgctcgct tgatgaatga tcaaatcttt taaagataaa
      121 agccatgcgt gaggctagat caacccttgt gcccccggca ggattcgaac ctgcggcctt
...
    54841 gtcgcccagt tgaatggctc gccac
//
Description of Fgenesb_annotator output fields:
For each genomic sequence (complete genome, scaffold, read, etc.) the program lists locations of predicted ORFs, rRNAs, tRNAs, promoters and terminators.
ORFs are labeled as CDS and provided with their order number in a sequence and an indicator of whether they are transcribed as a single transcription unit (Tu) or in operons (Op) (of course these are predictions).
If an ORF has a homolog, its short name is provided after a "##" separator (here name of only
one homolog - either from COG, KEGG, or NR - is given; best homologs from all databases are listed in ID lines of predicted proteins, see below).
For example:
5 4 Op 2 + CDS 2737 - 3744 871 ## COG0673 Predicted dehydrogenases
is description for predicted gene number 5 in 4th Operon with coordinates 2737 - 3744 in the '+' strand and it is the second gene in operon.
Coding chain for this CDS (+) means a direct chain, (-) means a complementary chain.
871 is a score of gene homology assigned by BLAST.
COG0673 is an ID of its homolog from the COG database.
In other words, first column lists an ordered number of predicted CDS, starting from beginning of a sequence; second column - number of predicted operon/TU, and fourth column - number of gene in an operon (always 1 for a TU).
For some operons, we report supportive evidence related to conservation in relative locations of genes in predicted operon in different bacteria. For example:
3 2 Op 1 4/0.002 + CDS 3193 - 3405 278 ## COG2501 Uncharacterized ACR
Here, in 4/0.002, 4 is a number of observations of this gene being next to one of its neighbors on known bacterial genomes (we call it N-value), while 0.002 is a P-value, an empirical probability of observing N occurrences of genes being adjacent by random chance. P is a very approximate measure. For all P<0.0001, the value in output is 0.000.
At the end of annotation, we also provide protein products of predicted genes in fasta format, with full name of homolog and homology scores according to BLAST.
Information about homologs is given in ID lines of predicted proteins, for example:
>gi|15807672|ref|NC_001264.1| GENE     7     11704  -     12609    872    301 aa, chain +
## HITS:3  COG:DRA0007 KEGG:DRA0007 NR:6460585 ## COG:
DRA0007 COG1131 # Protein_GI_number: 15807679 # Func_class: V Defense mechanisms  #
Function: ABC-type multidrug transport system, ATPase component # Organism: Deinococcus
radiodurans # 1     301       1     301     301     503  100.0  1e-142 ## KEGG: DRA0007 #
Name: not_defined # Def: putative ABC-2 type transport system ATP-binding protein #
Organism: D.radiodurans # Pathway: ABC transporters - General [PATH:dra02010] #
1     301       1     301     301     503  100.0  1e-142 ## NR: gi|6460585|gb|AAF12291.1|
ABC transporter, ATP-binding protein, putative
[Deinococcus radiodurans R1]^Agi|15807679|ref|NP_285331.1| ABC transporter, ATP-binding protein, putative
[Deinococcus radiodurans R1] # 1     301       1     301     301 503  100.0  1e-141
MITTFEQVSKTYGHVTALSDFNLTLRTGELTALLGPNGAGKSTAIGLLLGLSAPSAGQVR
VLGADPRRNDVRARIGAMPQESALPAGLTVREAVTLFASFYPAPLGVDEALALADLGPVA
GRRAAQLSGGQKRRLAFALAVVGDPELLLIDEPTTGMDAQSRAAFWEAVTGLRARGRTIL
LTTHYLEEAERTADRVVVMNGGRILADDTPQGLRSGVGGARVSFVSDLVQAELERLPGVS
AVQVDAAGRADLRTSVPEALLAALIGSGTTFSDLEVRRATLEEAYLQLTGPQDMTAVTRS
A
While looking a bit complex for a human eye, it is well suited for parsing by a program.
ID lines of predicted proteins consist of the following parts that are separated from each
other by "##" separator:
>gi|15807672|ref|NC_001264.1| GENE 7 11704 - 12609 872 301 aa, chain +
(sequence name, gene number, coordinates of a gene, length of a corresponding protein, chain)
## HITS:3 COG:DRA0007 KEGG:DRA0007 NR:gi|6460585|gb|AAF12291.1|AE001862_117
(shows the number of homologs found in protein databases (takes into account maximum one
best homolog per a database), lists homologs IDs in the format DB:ID (e.g., COG:DRA0007);
notes:
- for homologs from NR, gi- numbers are given as homologs IDs;
- DB:ns indicates that a protein DB was not searched (e.g., NR:ns);
- DB:no indicates that a protein DB was searched but no homologs were found
(e.g., NR:no))
Then, complete ID lines of homologs are given preceded by DB names where they were found by BLAST (e.g., NR:) and followed by statistics from corresponding BLAST outputs.
## COG: DRA0007 COG1131 # Protein_GI_number: 15807679 # Func_class: V Defense mechanisms
# Function: ABC-type multidrug transport system, ATPase component # Organism: Deinococcus
radiodurans # 1     301       1     301     301     503  100.0  1e-142

## KEGG: DRA0007 # Name: not_defined # Def: putative ABC-2 type transport system ATP-binding
protein # Organism: D.radiodurans # Pathway: ABC transporters - General
[PATH:dra02010] # 1     301       1     301     301     503  100.0  1e-142

## NR: gi|6460585|gb|AAF12291.1| ABC transporter, ATP-binding protein, putative
[Deinococcus radiodurans R1]^Agi|15807679|ref|NP_285331.1| ABC transporter, ATP-binding
protein, putative [Deinococcus radiodurans R1] # 1     301       1     301     301 503  100.0  1e-141
BLAST parameters of similarity found for predicted protein are shown in the following order:
Start and stop of region of similarity ( 1 301) in predicted protein
Start and stop of region of similarity (1 301) in homolog from a database
Length of homologous protein (301)
BLAST score (503)
BLAST Identity (100.0 %)
BLAST Expected value (1e-141)
For genes predicted as a result of mapping of ribosomal proteins to sequences, description lines for predictions and ID lines of corresponding (predicted) proteins look like following (note "PROTEIN SUPPORTED" keyword):
   164    86 Op  1  31/0.000   +    CDS     189676 -    190599   1604  ## PROTEIN
   SUPPORTED gi|26246115|ref|NP_752154.1| 30S ribosomal protein S2

>gi|48994873|gb|U00096.2| GENE   164    189676  -    190599   1604    307 aa, chain + ##
PROTEIN SUPPORTED ## NR: gi|26246115|ref|NP_752154.1| 30S ribosomal protein S2
[Escherichia coli CFT073] # 1     307       1     307     307 622  99 1e-176
LVSTTYLWYKARRTSDPFRIHRLDGSDNLTLCNNTHVSAHIPGCPLGSVIWDTWRHNPNF
YIEVLIMATVSMRDMLKAGVHFGHQTRYWNPKMKPFIFGARNKVHIINLEKTVPMFNEAL
AELNKIASRKGKILFVGTKRAASEAVKDAALSCDQFFVNHRWLGGMLTNWKTVRQSIKRL
KDLETQSQDGTFDKLTKKEALMRTRELEKLENSLGGIKDMGGLPDALFVIDADHEHIAIK
EANNLGIPVFAIVDTNSDPDGVDFVIPGNDDAIRAVTLYLGAVAATVREGRSQDLASQAE
ESFVEAE
If you run mapping of ribosomal proteins to sequences with option "allow frameshifts / internal stop codons", predictions with frameshifts, if any, are noted with keyword "orf_shift", and predictions with internal stop codons, if any, are noted with keyword "orf_stop".
For example, here is a prediction with frameshift(s) (note "orf_shift"):
2     1 Op  2  11/0.000   +    CDS        301 -      1973   2797  ## PROTEIN
SUPPORTED orf_shift gi|24051180|gb|AAN42537.1| 30S ribosomal subunit protein S1

>904 GENE     2       301  -      1973   2797    557 aa, chain + ## PROTEIN SUPPORTED
orf_shift  ## NR: gi|24051180|gb|AAN42537.1| 30S ribosomal subunit protein S1 [Shigella
flexneri 2a str. 301] # 1     557       1     557     557 1082  99 0.0
MTESFAQLFEESLKEIETRPGSIVRGVVVAIDKDVVLVDAGLKSESAIPAEQFKNAQGEL
EIQVGDEVDVALDAVEDGFGETLLSREKAKRHEAWITLEKAYEDAETVTGVINGKVKGGF
TVELNGIRAFLPGSLVDVRPVRDTLHLEGKELEFKVIKLDQKRNNVVVSRRAVIESENSA
ERDQLLENLQEGMEVKGIVKNLTDYGAFVDLGGVDGLLHITDMAWKRVKHPSEIVNVGDE
ITVKVLKFDRERTRVSLGLKQLGEDPWVAIAKRYPEGTKLTGRVTNLTDYGCFVEIEEGV
EGLVHVSEMDWTNKNIHPSKVVNVGDVVEVMVLDIDEERRRISLGLKQCKANPWQQFAET
HNKGDRVEGKIKSITDFGIFIGLDGGIDGLVHLSDISWNVAGEEAVREYKKGDEIAAVVL
QVDAERERISLGVKQLAEDPFNNWVALNKKGAIVTGKVTAVDAKGATVELADGVEGYLRA
SEASRDRVEDATLVLSVGDEVEAKFTGVDRKNRAISLSVRAKDEADEKDAIATVNKQEDA
NFSNNAMAEAFKAAKGE
For other predictions (rRNA, promoters, etc.) we provide only description lines, for example:
- LSU_RRNA 884415 - 887254 98.0 # Leuconostoc oenos S60377
rRNAs are labeled as LSU_RRNA (large subunit), SSU_RRNA (small subunit) or 5S_RRNA (5S), tRNAs as TRNA, promoters as Prom, and terminators as Term.
Terminator regions (their coordinates and scores) are reported by BTERM program:
+ Term 492 - 537 -0.9
Promoters (their coordinates and scores) are reported by TSSB1 program.
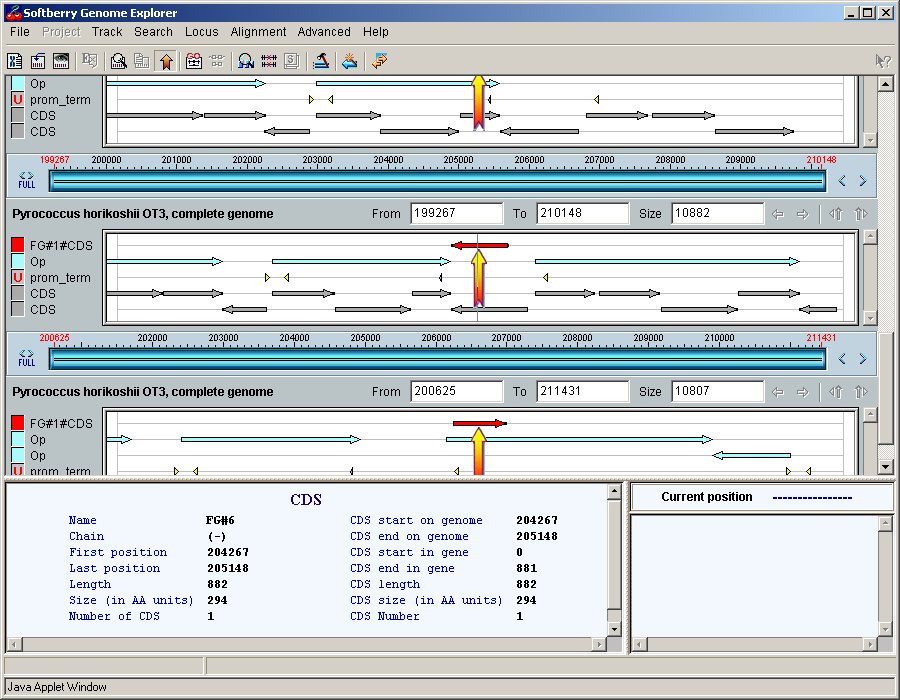
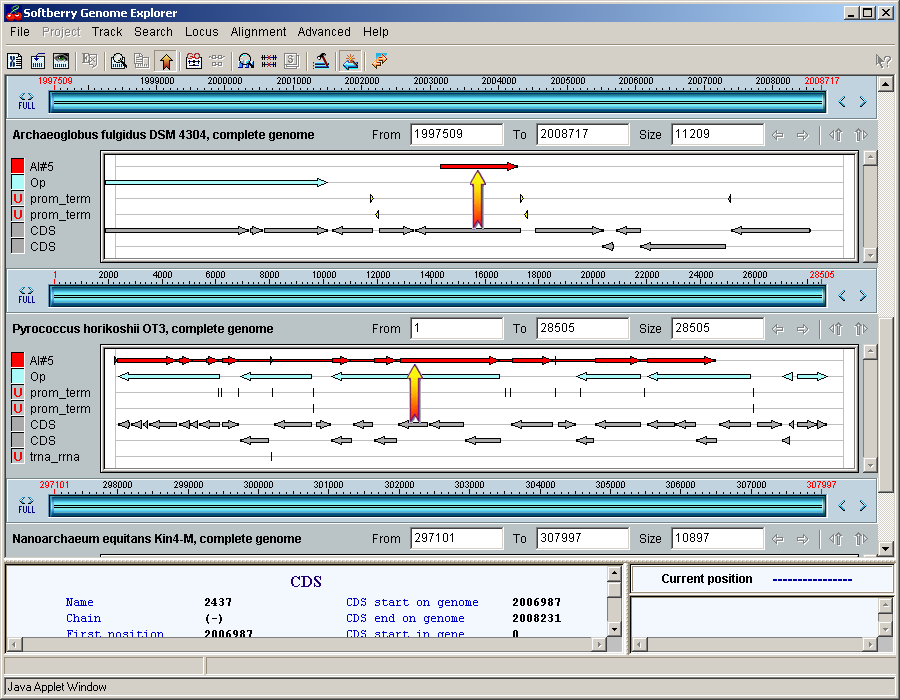
2. General system description
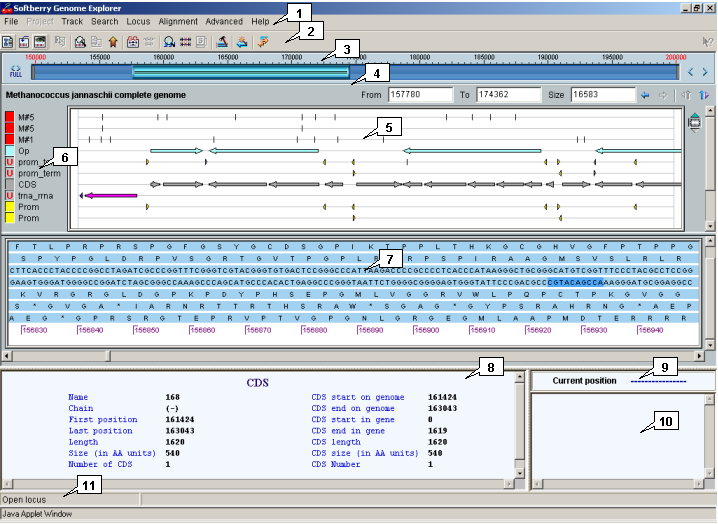
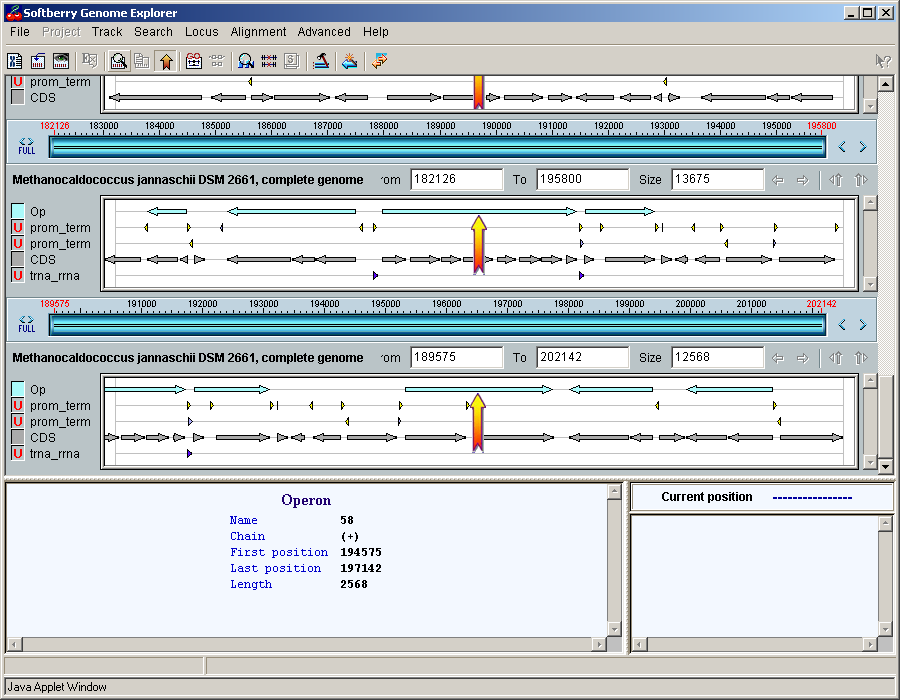
2.1. Main window
The main window contains the following objects::
- Main menu;
- Toolbar;
- Graphic navigation bar;
- Precise navigation bar;
- Map;
- Sequence display area;
- Information bars;
- Status bar.
For each loaded locus (or genome) the individual map, bars of graphic and precise navigation, and sequence display area are represented. The loaded loci can be scrolled down.
2.2. Commands
2.2. Main menu commands
The main menu includes several commands groups:
-
The File menu group, combines the following commands:
- Login not active in the current version;
- Logout - not active in the current version;
-
Import locus from
- calls out the "Import locus dialog" window for data importing;
- Local data - uploading data to user's profile on a server;
- Public data - loading data from the public profile to a personal one;
-
Export locus
- uploading a locus onto a server;
- FgenesB Annotator - in the "FgenesB Annotator" format;
- Genbank - in the "Genbank" format;
- Quit - close the applet.
-
The Project menu group, not active in the current version.
-
The Track menu group, combines the following commands:
- Add new track - not active in the current version;
- Set editing track- calls out the "Set editable track" dialog for choosing features types to be edited;
- Set view track- calls out the "Set view tracks" dialog for choosing features types to be displayed;
- Set load track- calls out the "Set load tracks" dialog for choosing features types to be loaded;
- Remove track from project - not active in the current version.
- The Search menu group, combines the following commands:
-
Find feature - calls out the "Find features" dialog for features finding. The dialog can also be called by
-
Find genes - calls out the "Find genes" dialog for genes finding. The dialog can also be called by
-
Find motif - calls out the "Find motif" dialog for motifs finding. The dialog can also be called by
- The Locus menu group, combines the following commands:
- Open - calls out the "Open locus" dialog for selecting a locus to be displayed;
- Loci - calls out the "Loci" dialog with the list of loci to be displayed;
- Close - calls out the "Closing loci" dialog for excluding a locus from those to be displayed;
- Options - not active in the current version.
- The Alignment menu group, combines the following commands:
-
Find alignment - calls out the "Find alignment" dialog for getting alignment. The dialog can also be called by
- Comparison - calls out the "Genome comparison window" dialog for genomes comparison.
- The Advanced menu group, combines the following commands:
- Configuration - calls out the Genome explorer options dialog for setting up the applet options
- Sample Sequences - not active in the current version;
- Run seltag - not active in the current version;
- The Help menu group, combines the following commands:
- Content - not active in the current version.
- About dialog - calls out the text box with information on the current version of the applet.
2.2. Commands of the control panel
Functions of control panel buttons:
| "Open locus" - calls out the "Open locus" dialog for selecting a locus to be loaded (same as the "Locus->Open" command from the main menu). | |
| "Load Tracks" - calls out the "Set load tracks" dialog for choosing features types to be loaded and their display order (same as the "Track-> Set load track" command from the main menu). | |
| "Visible tracks" - calls out the "Select view tracks" dialog for choosing features types to be displayed on the map (same as the "Track-> Set view track" command from the main menu). | |
| - not active in the current version. | |
| "Find Features" - calls out the "Find features" dialog for features finding (same as the "Search->Find Feature" command from the main menu). | |
| "Found features" - calls out the "Found features" dialog with the list of found features. | |
| "Show Arrow" - shows\hides the arrow pointing to the map area with found feature or alignment. | |
| "Get Alignment" - calls out the dialog for getting alignment (same as the "Search->Find Alignment" command from the main menu). | |
| "Found Alignment List" - calls out the list of previously found alignments. | |
| "Search Genes" - calls out the "Find genes" dialog for genes finding (same as the "Search->Find Genes" command from the main menu). | |
| "Get Motif" - calls out the "Find motif" dialog for motifs finding (same as the "Search->Find Motif" command from the main menu). | |
| "Sample Sequences" - not active in the current version. | |
| "Set track map editing mode" - sets the feature edit mode on. | |
| "Show comparison map" - calls out the "Genome comparison window" dialog for genomes comparison. | |
| "Help" - not active in the current version. |
Note! Placing the mouse pointer over a button on the control panel causes the button name to be displayed in the status bar of main window.
2.2.3. HotKeys
<Ctrl+F> - calls out the "Find features" dialog for features finding.
<Ctrl+G> - calls out the "Find genes" dialog for genes finding.
<Ctrl+M> - calls out the "Find motif" dialog for motifs finding.
<Ctrl+A> - calls out the "Find alignment" dialog for getting alignment.
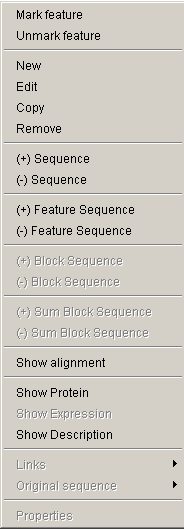
2.2.4. Feature pop-up menu
In addition to information on a certain feature that is displayed on the information panel, Softberry Genome Explorer provides extra data on this feature via the feature pop-up menu. The menu can be called out by mouse right clicking over a feature. Some commands from this menu might be unavailable for a certain feature.
-
The "Mark feature" command marks the chosen
feature with an arrow on the map. The
 button shifts an arrow to the previous feature of the same type,
the
button shifts an arrow to the previous feature of the same type,
the  button - to the next one. The way of arrow shifting over the map can
be specified in the Genome explorer options dialog.
button - to the next one. The way of arrow shifting over the map can
be specified in the Genome explorer options dialog.
- The "Unmark feature" command removes the marking arrow from selected feature.
-
The "New" command calls out the "New feature" dialog, that allows to add a new feature:
- The "Position from" field allows to specify the feature start position.
- The "Position to" field allows to specify the feature end position.
- The "Label" field allows to specify the feature ID.
- The "Chain" list allows to choose the strand in which a feature should be located.
- The "Loci" list allows to choose the locus in which a feature should be located.
- The "Tracks" list allows to choose the type to which a feature should belong.
- The "OK" button closes the window with following adding of a feature.
- The "Cancel" button closes the window without adding of a feature.
-
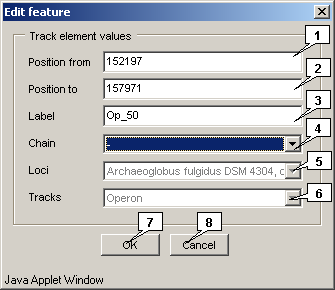
The "Edit" command calls out the "Edit feature" dialog that allows to edit a feature:
- The "Position from" field allows to change the feature start position.
- The "Position to" field allows to change the feature end position.
- The "Label" field allows to change the feature ID.
- The "Chain" list allows to change the strand in which a feature should be located.
- The "Loci" list allows to change the locus in which a feature should be located.
- The "Tracks" list allows to change the type to which a feature should belong.
- The "OK" button closes the window with following applying of changes.
- The "Cancel" button closes the window without applying of changes.
- The "Copy" command provides the copying of a feature.
- The "Remove" command provides the deleting of a feature.
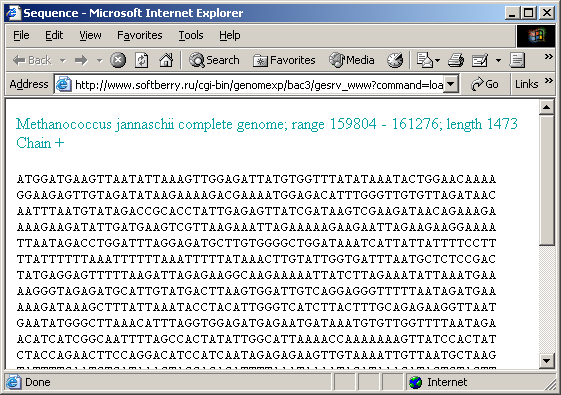
- The "(+) Sequence" command shows the sense strand ("+"-strand, virulent strand) of the genome. The command calls out the window with direct strand sequence of a chromosome that is currently pointed by mouse. The output style for the region can be specified in the Genome explorer options dialog.
- The "(-) Sequence" command shows the anti-sense strand ("-"-strand, complementary strand) of the genome. The command calls out the window with reverse strand sequence of a chromosome that is currently pointed by mouse. The output style for the region can be specified in the Genome explorer options dialog.
- The "(+) Feature Sequence" command shows the sense strand of the feature. The command calls out the window with direct strand sequence of a feature that is currently pointed by mouse. In the sequence output window the lowercase letters correspond to flanking regions, the bold ones - to the feature itself. Inside a feature the interchangeable blocks are colored in blue and green, the linking sequences - in black. The red color is used to mark the block that was pointed at the moment of pop-up menu calling, otherwise nothing would be marked in red. The output style for the region can be specified in the Genome explorer options dialog.
- The "(-) Feature Sequence" command shows the anti-sense strand of the feature. The command calls out the window with reverse strand sequence of a feature that is currently pointed by mouse. The color layout in the reverse strand output window will be the same as for direct one. The output style for the region can be specified in the Genome explorer options dialog.
- The "(+) Block Sequence" command shows the sense strand of the block. The command calls out the window with direct strand sequence of a feature block that is currently pointed by mouse. In the output window the block will be marked with a color. The flanking sequence that is part of a feature will be shown in bold uppercase letters, the flanking sequence that is not part of a feature will be shown in lowercase letters. The output style for the region can be specified in the Genome explorer options dialog.
- The "(-) Block Sequence" command shows the anti-sense strand of the block. The command calls out the window with reverse strand sequence of a feature block that is currently pointed by mouse. The output style for the region can be specified in the Genome explorer options dialog.
- The "(+) Sum Block Sequence" command shows the sense strand of the summary feature blocks sequence. The command calls out the window with direct strand of summary blocks sequence of a feature that is currently pointed by mouse. The blocks sequences are marked with bold uppercase letters and interchangeable blue and green colors. Flanking sequences are in lowercase letters. The output style for the sequence can be specified in the Genome explorer options dialog.
- The "(-) Sum Block Sequence" command shows the anti-sense (reverse) strand of summary blocks sequence of a feature that is currently pointed by mouse. The output style for the sequence can be specified in the Genome explorer options dialog.
- The "Show Alignment" command calls out the output window with obtained alignment.
- The "Show Protein" command calls out the "Protein" dialog with information on a feature and sequence of a protein that is coded in this feature.
- The "Show Expression" command is not active in the current version.
-
The "Show Description" command calls out the "Description" dialog with the following information on a feature:
- genome, in which the current feature is located
- name of the feature type
- numbers of first and last feature positions and its length
- strand direction (if available)
- identifier (if available)
- brief information on the feature
- description of the feature
- The "Links" menu contains the list of links to www-resources that provide additional information on the current feature. If no links are available the item is not active, otherwise the set of available links is shown.
- The "Original Sequence" menu allows to download the original feature sequence from existing databases (multiple links are possible). During the download process the message box appears on the screen. Once downloading in finished, the "Get Alignment" dialog appears. The downloaded sequence in Fasta-format is shown in the "Sequence" field of this dialog, the feature ID - in the "Current alignment" field. It allows to perform the immediate aligning of the downloaded feature.
- The "Properties" command is not active in the current version.

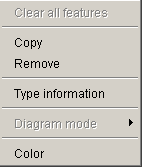
2.2.5. Features type pop-up menu
To get the information on a feature type place the mouse pointer over the colored square near the name of type on the auxiliary map panel. It will cause the feature type name to appear in the left information panel. The right click will cause the features type pop-up menu to appear.
-
This menu contains the following commands:
- The "Clear all features" command removes all features of the current type.
- The "Copy" command creates the copy of the current features type.
- The "Remove" command removes the current features type.
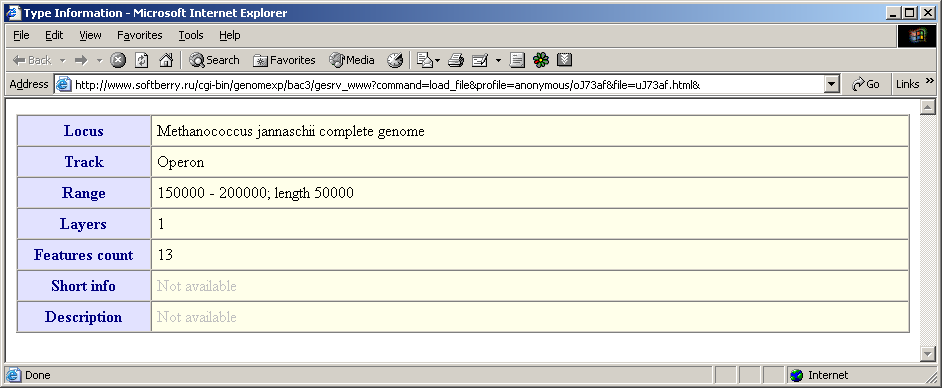
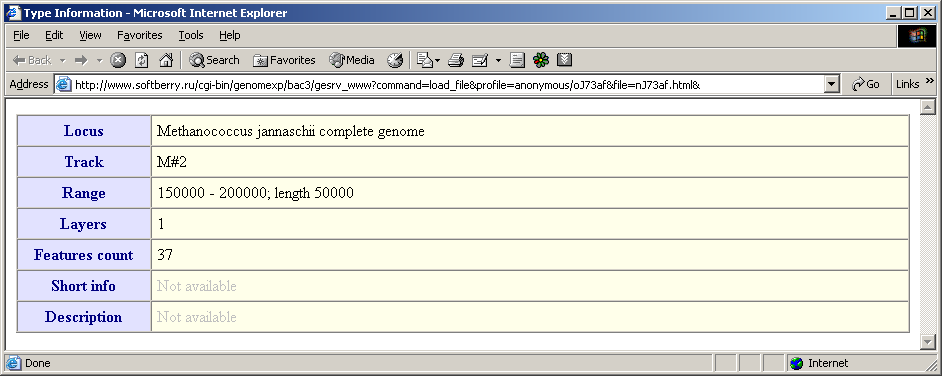
- The "Type information" command calls out the window with information on the current type. The data include the following fields: locus, features type name, the loaded region, number of layers for the current type, number of features of the current type, brief information and description.
- The "Diagram mode" command - not active in the current version.
- The "Color" command calls out the Color dialog for setting up a color for feature type.
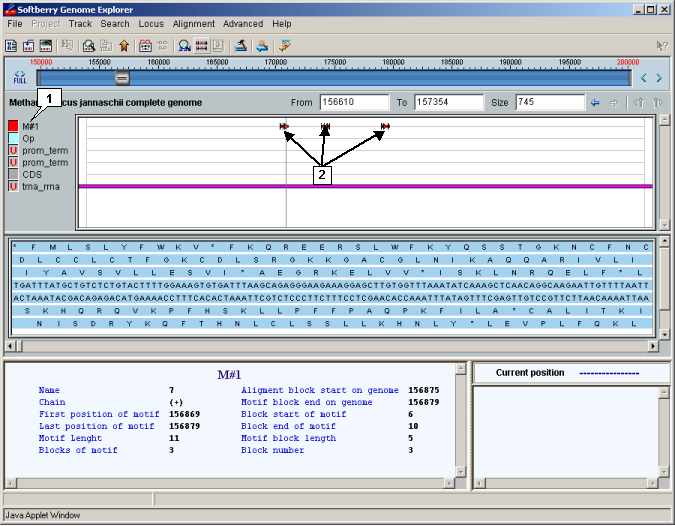
2.3. Map
The map provides a schematic visualization of loaded data marking and information on features in convenient style for user. The map allows to change the image scaling and to explore the loaded region. To the left of map the map auxiliary panel is located.
In the map area (area of features display), features are used to be displayed. If features of the same type overlap each other, they are represented in several layers that lay one over another. The order of different features types corresponds to that in features types selection window.
The types of features may be combined into the following classes or types species: block features (motifs, alignments etc) and non-block or simple features (promoters, operons etc).
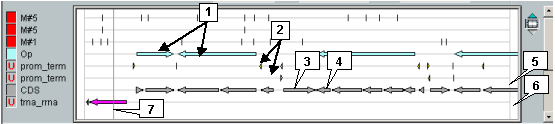
In the case of block features, the color rectangles with arrows correspond to blocks while the thin lines between them - to interblock sequences. Arrow direction on a block corresponds to that of strand, in which the current feature is located.
Simple features are used to be represented as arrowed color rectangles without interblock sequences.
The total features layers are shown over the grey background (if appropriate options "Combined" or "Combined+All" are on). Regions, in which at least two features of the same type overlap each other (these features are for sure in different layers), are shown in dark grey.
The features display area itself also consist of three parts: left cut area, central part and right cut area. These parts are separated from each other by border lines.
The central part of features display area is ruled with horizontal lines in accordance to the number of displayed layers. It corresponds to coordinates of selected region. In cut areas no features displayed except those are in selected region but spread out its' borders. Cut areas allow to indicate features that are fully in selected region and that continue outside this region (in this case, feature rectangle continues into cut area).
If the cursor is inside the central part of features display area, then its current position in locus is revealed in the appropriate field.
If the "Show navigation line" option in Genome explorer options dialog ("Track map" tab) is on, then the current cursor position is shown on the map as a vertical line that never goes outside the border lines.
- Enabling the "Allow visual map navigation" option in Genome explorer options dialog allows to navigate map using mouse and control keys. If the "Repaint on drag" option is on, the map redrawing occurs simultaneously with mouse movement, otherwise - after mouse button release only. The following operations are available:
- To slide the map by mouse in both directions not holding any control key.
- Holding the "Shift" key to change the map scaling by mouse. The scaling occurs from the map center. Sliding the mouse to the right causes the map zoom in, to the left - zoom out. Releasing and pressing again the "Shift"key during the mouse movement leads to switch from scaling mode to sliding one, and back again.
- Holding the "Ctrl" key to maximize the map scaling by clicking on any point of map. The region to display will be:
- To the right of the click point if the previous scaling was too small;
- Or include the click point.
- Holding the "Ctrl" key to select an appropriate part of map by drawing a rectangle with the mouse. The scaling will occur after releasing the mouse button inside the left and right borders of rectangle.
Note! The "Ctrl" key should be held during all the mouse manipulations, beginning with mouse button holding and finishing with its releasing, otherwise the procedure will not be completed.
Auxiliary panels are intended for marking up the layers and retrieving the information on features types. In the left panel, near the color markup, the brief names of features are used to be represented. If the number of layers for some of a feature exceeds the ones could be displayed (e.g. when the "Compact mode" is ON), in the right area panel the scrolling wheel that allows to switch to the layer of interest appears. In the right panel there is the vertical scrollbar for scrolling map up or downward.
2.4. Graphic navigation bar
Using the graphic navigation bar user can select approximate borders of a region to be displayed on the map. This bar is valid for loaded region only.
When the "Repaint on drag" mode is ON, the map will be scrolled simultaneously with slider movement (when it is moved by mouse), otherwise the map redrawing will occur only after releasing the mouse button.
The slider movement area corresponds to loaded locus region. The borders of the movement area are intended for superposing with slider borders. In the utmost left or right position of the slider one of its borders superposes that of the movement area.
-
Operating the graphic navigation bar is performed with use of mouse. The rectangle of slider represents the fragment of loaded region that is displayed on the map (borders are not included in this region). Borders and/or scaling of this region can be changed with use of slider by several means:
- By dragging it with mouse to the left or right;
- By picking an appropriate border with mouse and dragging it in appropriate direction.
Holding the "Shift" key and dragging the slider border by mouse lead to change of both borders: the slider expands or shortens regarding the center of itself.
To the left of navigation bar the
![]() button is located. Clicking this button leads to selection of all loaded region. In this case the slider occupies the whole movement area.
button is located. Clicking this button leads to selection of all loaded region. In this case the slider occupies the whole movement area.
To the right of navigation bar the
![]() and
and
![]() shift buttons are located. Clicking some of these buttons leads to shift of a selected region (and slider itself) in appropriate direction.
shift buttons are located. Clicking some of these buttons leads to shift of a selected region (and slider itself) in appropriate direction.
Clicking on the movement area to the left or right of the slider leads to shift of the map in appropriate direction for current map width.
2.5. Precise navigation bar
-
The Precise navigation bar is intended for accurate specification of the displayed genome region borders. The bar contains the name of loaded genome, fields with displayed region parameters and a number of buttons:
- The "From" field - represents the starting position of displayed region;
- The "To" field - represents the ending position of displayed region;
- The "Size" field - represents the size of displayed region.
-
The
 button - "Back" - reverses the map shift.
-
The
 button - "Forward" - returns the previously reversed map shift.
-
The button - "Previous feature" - marks the previous feature with arrow.
-
The button - "Next feature" - marks the following feature with arrow.
Note! Change of the value in a field (more exactly, the fixing of entered value) occurs after typing a new value and pressing the "Enter" button, or after field focus lost (removing a cursor from an appropriate field). Once entered the value is being corrected in accordance to restrictions that depend on locus size and then reappears.
Note! On change of the value in one field, the automatic changes in other fields may occur.
If value in the "Size" field was changed, the one in the "To" field will be recalculated while the content of the "From" field will remain unchanged.
If value in the "From" field was changed, the one in the "Size" field will be recalculated while the content of the "To" field will remain unchanged.
If value in the "To" field was changed, the one in the "Size" field will be recalculated while the content of the "From" field will remain unchanged.
Note! On changes in the fields values the appropriate changes in size and location on navigator of the rectangle that represents a selected region as well as map redrawing occur. And vice versa, the changing of a region with use of navigator or at map shifting by mouse, the changes in values in appropriate fields occur.
2.6. Sequence display area
The area is intended for representing the nucleotide sequences and open reading frames of loaded genomes with original positions numbering.
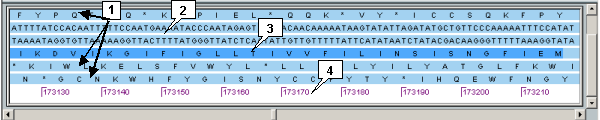
On mouse clicking on a feature, the sequences in area are being shifted in such a way that allows to display the feature location on the nucleotide sequence or ORF ("*" means the terminating codon). The feature is highlighted.
Shifting of sequences can be performed by the slider below the panel.
2.7. Information panels
Information panels are intended for output information on features and their types that are currently pointed by mouse.
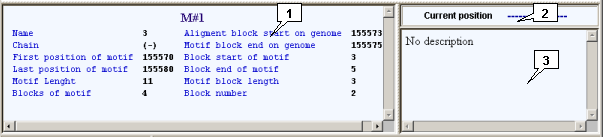
The left information panel represents the information on a feature (on the top the title shows the type of a feature, below the title the data on a feature, such as feature name, nucleotide strand direction, starting and ending positions, feature's length etc are shown). If feature consists of several blocks and one of them is currently pointed by mouse, then in the left column the data on a feature and in the right column the data on a block are shown.
Above the right information panel the "Current Position" field is located. This field shows the currently pointed locus position. The current position is being displayed only when the pointer is inside the displayed features area.
The right information panel represents either brief information (it is completely identical to content of the "Short info" string in the "Description" window that can be called out by the "Show Description" command in the feature's pop-up menu (see below)) on a feature, or information on a type (if pointer is directed on an appropriate item).
If the "Show information on mouse over" is ON, the information on a feature (both full and brief) is shown when the mouse pointer is directed on it, otherwise the information is shown only after clicking on appropriate feature.
Information on the last feature is being stored and displayed on the information panel until the pointer is directed on another one. If the pointer is directed on a region that does not contain any feature, the information panel is not cleared and displays information on the last pointed feature.
2.8. Uploading data to user's profile on a server
-
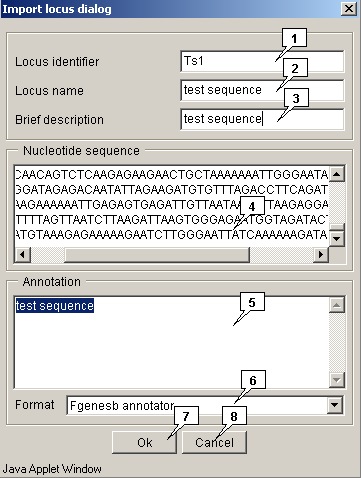
The "File>Import locus from>local data" command calls out the "Import locus dialog", that is intended for uploading the local data to the applet:
- In the "Locus identifier" field the Locus ID should be defined;
- In the "Locus name" field the Locus name should be defined;
- In the "Brief description" field the Locus brief description should be defined;
- In the "Nucleotide sequence" field the Locus sequence should be defined;
- In the "Annotation" field the Locus annotation should be defined.
-
In the "Format" list the appropriate format of a sequence should be selected. The following formats are available:
- Fgenesb annotator
- Genbank
Clicking the "OK" button leads to closing the window and loading a locus, clicking the "Cancel" one leads to closing the window without locus loading.
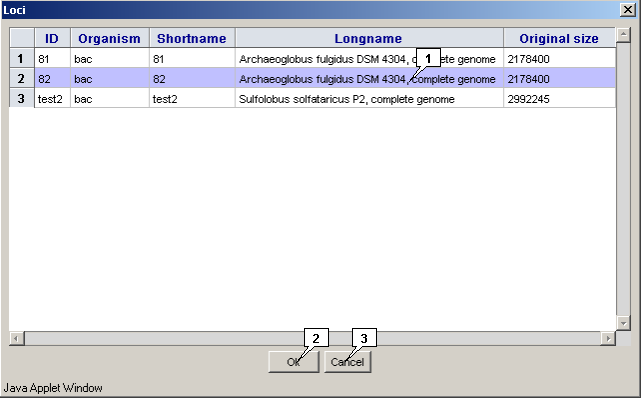
2.9. Loading data from the public profile to a personal profile
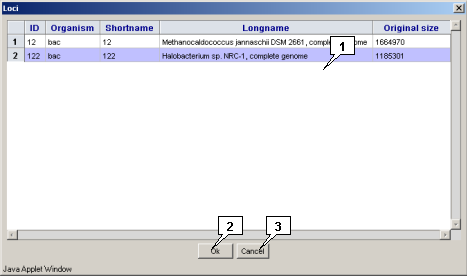
The "File>Import locus from>public data" command calls out the "Loci" dialog, that is intended for loading a genomic sequence(s) from the server vault into the applet in the form that is convenient for editing. To load a locus, select it in the list and click the "OK" button.
-
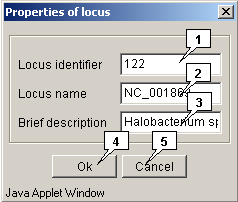
In the appeared "Properties of locus" dialog (fig. 1.9.2) specify the following items:
- The locus ID in the "Locus identifier" field;
- The locus name in the "Locus name" field;
- The locus brief description in the "Brief description" field.
Clicking the "OK" button leads to closing the window and loading a locus, clicking the "Cancel" one leads to closing the window without locus loading. The loaded locus will be added to the list in the "Open locus" dialog that can be called out via the "Locus>Open" command of the application main menu.
2.10. Downloading data to a local drive
Downloading data to a local user's drive can be performed via the "File>Export locus" command. The "File>Export locus>FgenesB annotator" or "File>Export locus>Genbank" commands call out the "Loci" dialog that is intended for loading for locus downloading. To download a locus, select it in the list and click the "OK" button.
If the "Use HTML browser for information view" checkbox (the "General" tab in the Genome explorer options dialog) is checked in, the locus is printed out in the browser window in selected format, otherwise it is saved to a local hard disc.
2.11. Opening a locus in applet
-
The "Locus>Open" command in the main menu calls out the "Open locus" dialog that is intended for opening a locus in the applet:
- The list of loci provides the locus selection;
- The graphic and precise navigation bars provide the selection of displayed region.
The "OK" button serves for closing the window and performing the selected operation, the "Cancel" one - for closing the window without completing the selected operation.

2.12. List of opened loci
The "Locus>Loci" command in the main menu calls out the "Loci" dialog with the list of currently opened loci.
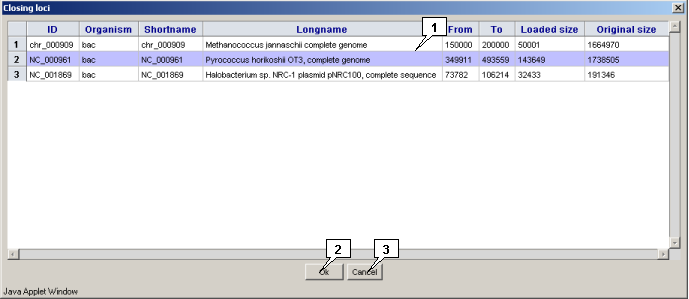
2.13. Closing a locus
The "Locus>Close" command in the main menu calls out the "Closing loci" dialog that is intended for closing a locus in the applet. To close a locus, select it in the list and click the "OK" button.
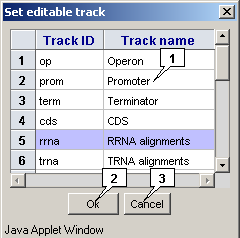
2.14. Selecting a feature's type for editing
The "Track>Set editing track" command in the main menu calls out the "Set editable track" dialog that is intended for selecting a feature's type, which should be edited. To select an appropriate type, click on it in the list and then click on the "OK" button.
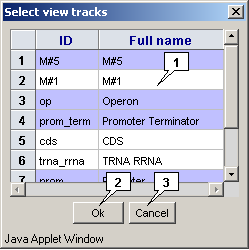
2.15. Selecting a feature's type for viewing
The "Track>Set view track" command in the main menu calls out the "Set view tracks" dialog that is intended for selecting feature's types, which should be displayed. To select appropriate types, click on them in the list and then click on the "OK" button.
Once a new locus is loaded, the previously selected types of features only are displayed.
2.16. Selecting features' types for loading and their display order
The "Track>Set view track" command in the main menu calls out the "Set view tracks" dialog that is intended for selecting feature's types, which should be displayed. To select appropriate types, click on them in the list and then click on the "OK" button.
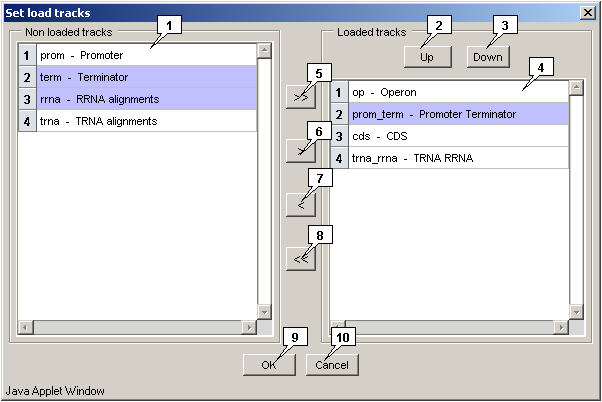
The "Track>Set load track" command in the main menu calls out the "Set load tracks" dialog that is intended for selecting feature's types, which should be loaded, as well as their display order.
-
To include appropriate types of features to the list of that for loading the following steps are required:
- Select the required types in the "Non-loaded tracks" list;
-
Click the
 button for moving the selected types to the list of that to be loaded. The moved types will be added to the end of list and in the same order as they were in the list of unloaded types.
To include all types of features to the list of that for loading, click the
![]() button.
button.
-
To exclude appropriate types of features from the list of that for loading the following steps are required:
- Select the required types in the "Feature types to load" list;
-
Click the
 button for moving the selected types to the list of that not to be loaded. The moved types will be added to the end of list and in the same order as they were in the list of unloaded types.
To exclude all types of features from the list of that for loading at the time, click the
![]() button.
button.
The display order of features types will be the same as one in the list of types for loading. To change it, use the "Up" and "Down" buttons. On clicking the appropriate button the selected type will be shifted for one position in corresponding direction.
2.17. Searching for feature
- The "Find features" dialog can be called out by one of the following means:
- Using the "Search->Find Feature" command from the main menu;
-
Clicking the
 button on the toolbar.
- Using the "Ctrl+F" hotkeys.
Once the search is done, its parameters and results are being saved.
The "Saved searches" list contains identifiers of previously saved queries. Selecting one of the saved identifiers leads to display of its parameters in the window. The "Remove" button serves for removal of a single query from the list. The "Remove all" button removes all existing queries from the list.
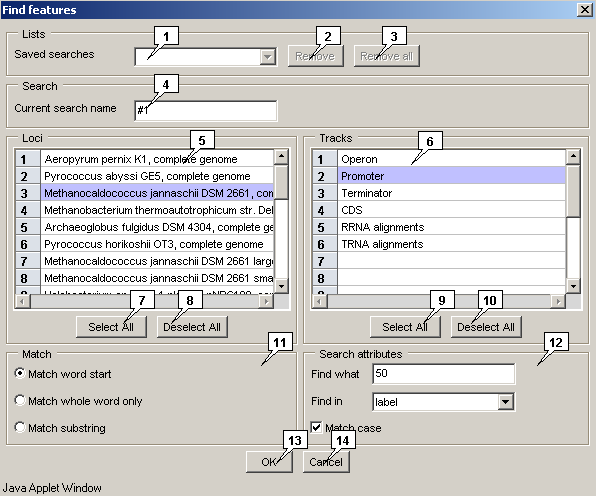
The "Current search name" field allows to specify an ID of current search;
The "Loci" list contains the names of available genomes;
The "Tracks" list contains the names of available types of features;
The "Match" panel allows to choose the search mode:
The "Search attributes" panel allows to specify the search parameters:
The "OK" button serves for closing the window and performing the selected operation, the "Cancel" one - for closing the window without completing the selected operation.
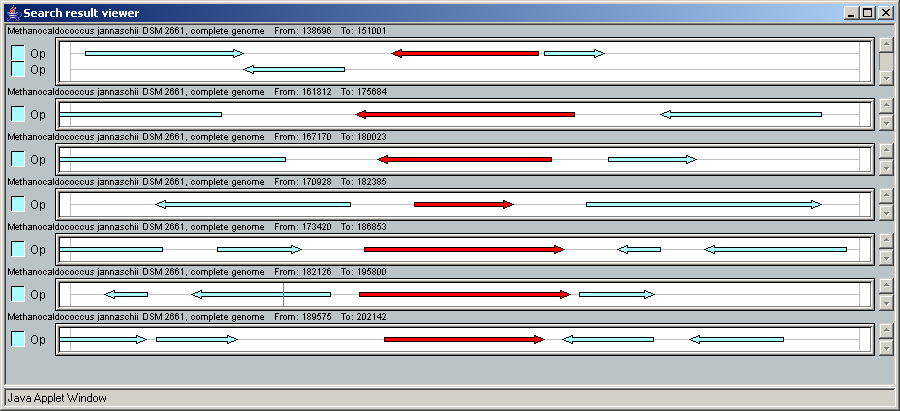
2.17.1. List of found features
-
The "Found features" dialog contains:
- The "List of searches" list with identifiers of previously saved searches. On selecting one of ID's the results of corresponding search will be displayed in the window.
- The "Feature for position" field with ID of the selected feature. If one feature is selected, the field contains its ID, if multiple features are selected, the field is empty.
- The "Features list" list with found features. Clicking on a feature leads to its selection.
- The "Close" button serves for window closing.

-
The features list pop-up menu can be called out by mouse right click on it. It contains the following commands:
- Show in separate window - to load regions with selected features in a separate window
- Show in main window - to load regions with selected features in the main application window
- Select all - to select all features;
- Deselect all - to remove all selections from features;
- Get sample sequence - not active in the current version;
- Copy - not active in the current version.
2.18. Searching for genes
- The "Find genes" dialog for genes search parameters setting up can be called out by one of the following means:
- Using the "Search->Find Genes" command from the main menu;
-
Clicking the
 button on the toolbar.
- Using the "Ctrl+G" hotkeys.
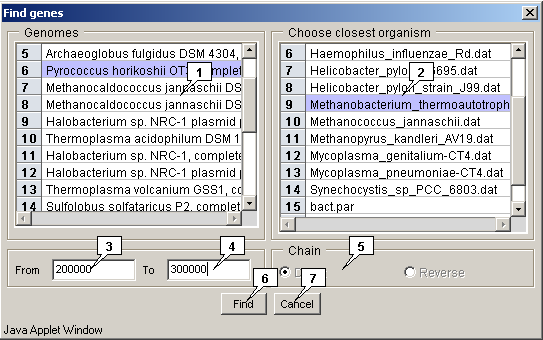
The "Genomes" list allows to choose a genome;
The "Choose closest organism" list allows to choose an organism;
The "From" field allows to specify the starting position of a search region;
The "To" field allows to specify the ending position of a search region;
The "Chain" panel allows to choose the search strand:
The "Find" button serves for closing the window and performing the search operation, the "Cancel" one - for closing the window without completing the selected operation.
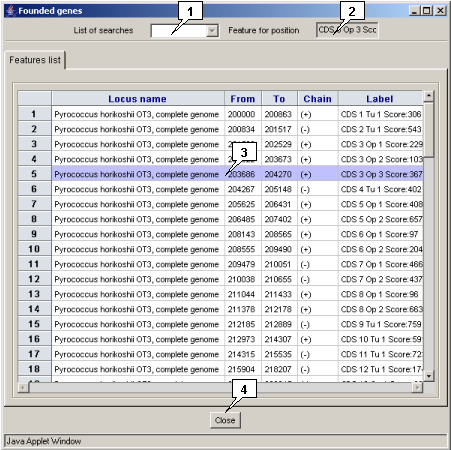
2.18.1. List of found genes
-
The "Found genes" dialog contains:
- The "List of searches" list with identifiers of previously performed and saved searches. Selecting any of identifiers leads to display the appropriate search results.
- The "Feature for position" " field with identifier of a selected gene. Selecting multiple genes leads to the field becomes empty.
- The "Features list" list with found genes. To select a gene, click on it.
- The "Close" button serves for window closing.
-
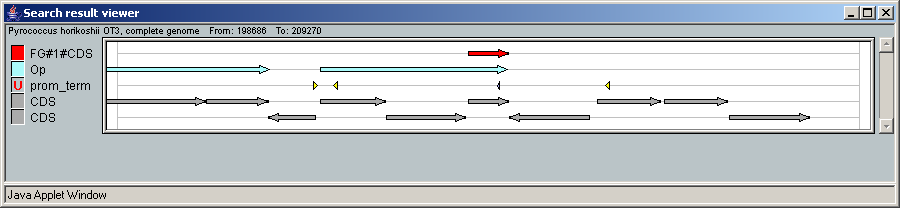
The Genes list pop-up menu can be called out by mouse right click on it.
It contains the following commands:
- Show in separate window - to load regions with selected genes in a separate window
- Show in main window - to load regions with selected genes in the main application window
- Select all - to select all genes;
- Deselect all - to remove all selections from genes;
- Get sample sequence - not active in the current version;
- Copy - not active in the current version.
2.19. Searching for motifs
- The "Find motif" dialog for genes search parameters setting up can be called out by one of the following means:
- Using the "Search->Find Motif" command from the main menu;
-
Clicking the
 button on the toolbar.
- Using the "Ctrl+M" hotkeys.
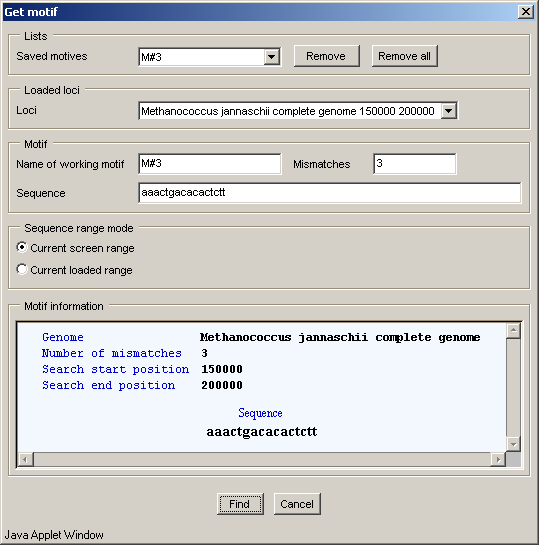
In the "Find motif" dialog, below the title, there is the "Saved motives" list with ID's of previously performed searches. Selecting one of them will cause the information on this search to appear in the "Motif information" panel. The data will include: locus name and the region where the search was performed, number of mismatches and sequence searched for. The "Remove" and "Remove all" buttons allow to remove a single search or all searches from this list correspondingly. Clicking these buttons causes the confirmation dialogs to appear
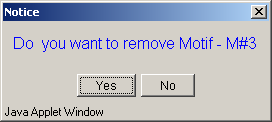 |
 |
The "Loaded loci" list allows to choose a locus for search.
The "Name of working motif" field allows to specify the ID of current motif search.
The "Mismatches" field allows to specify the maximal allowed mismatches number.
The "Sequence" field allows to specify the sequence to search for (sequence must not contain gaps, otherwise the motif shall not be found).
The "Sequence range mode" panel allows to choose the locus region for search:
The "Find" button serves for closing the window and performing the search operation, the "Cancel" one - for closing the window without completing the selected operation.
During the search the "Wait" message box appears.
Once the search is done, a new type with the same name as was assigned to search (
e.g.
Comment. Name of the new type is placed to top position in the list in the "Select view tracks" dialog. The dialog allows to choose features types that will be displayed on the map).
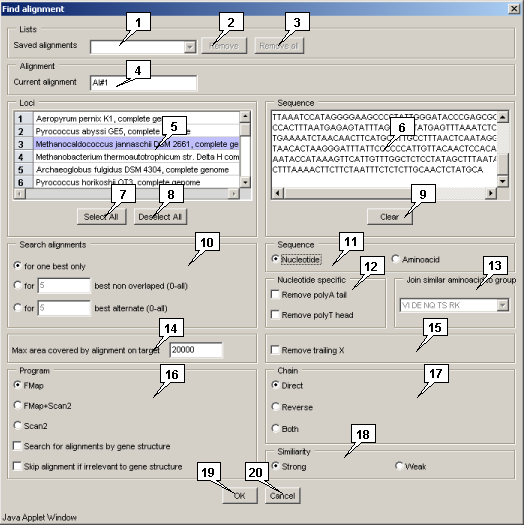
2.20. Searching for alignments
Softberry Genome Explorer provides the tool for aligning of sequences with a wide variety of search parameters. This tool is based on two different algorithms. The first algorithm provides the high speed performance at "low quality", i.e. it finds the obvious homology, but may miss some small blocks of homology (Fmap). The second one finds all homology blocks at significantly lower speed (Scan2). It often makes sense to find for beginning the rough alignment (using FMap) and then to search in the found region for precise alignment (using Scan2).
-
The "Find alignment" dialog for setting up the search parameters can be called out by one of the following means:
- Using the "Search->Get Alignment" command from the main menu;
-
Clicking the
 button on the toolbar.
- Using the "Ctrl+A" hotkeys.
- "For one best" - to get the best alignment only. The result is the single "best" alignment per locus.
- "For N best non overlapped" - to get not more than "N" non-overlapping alignments. Setting the value to "0" means that all possible non-overlapping alignments will be output.
- "For N best alternate" - to get not more than "N" alternate alignments. Setting the value to "0" means that all possible alternate alignments will be output.
- "Nucleotide" - nucleic acid sequence.
- "Aminoacid" - aminoacid sequence.
- "Remove polyA tail" - to remove flanking polyA sequences.
- "Remove polyT head" - to remove flanking polyT sequences.
- "FMap" - rough aligning mode;
- "Fmap+Scan2" - combined search mode, when for beginning the obvious homology is searched, after which the found region is used for precise aligning;
- "Scan2" - precise aligning mode.
- The "Search for alignment by gene structure" checkbox enables the checking of alignment for correspondence to gene structure.
- The "Skip alignment if irrelevant to gene structure" checkbox enables the excluding from consideration of alignments that do not correspond to gene structure.
- "Direct" - in direct (sense) strand.
- "Reverse" - in reverse (anti-sense) strand.
- "Both" - in both strands.
- "Weak" - low similarity.
- "Strong" - high similarity.
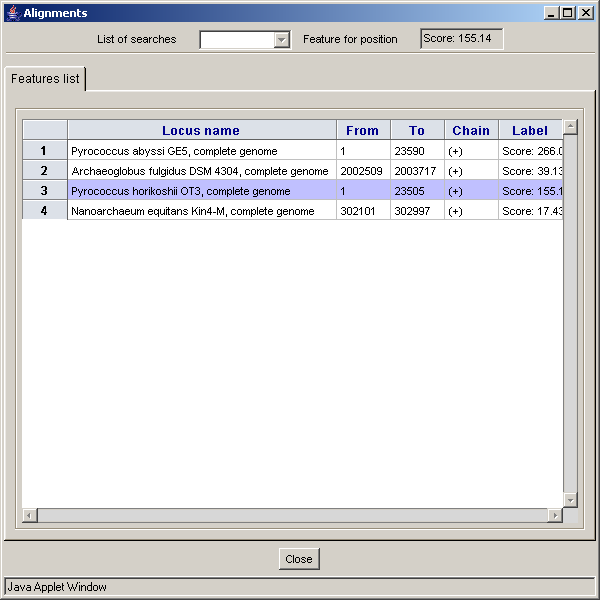
- The "List of searches" list contains identifiers of previously saved searches. Selecting one of identifiers causes the results of appropriate search to appear in the window.
- The "Feature for position" field with the selected alignment ID. If a single alignment is selected, the field contains the score of this alignment, otherwise the field is empty.
- The "Features list" list. To select an alignment click on it.
- The "Close" button for closing the window.
- Show in separate window - to load regions with selected alignments in a separate window
- Show in main window - to load regions with selected alignments in the main window
- Select all - to select all available alignments.
- Deselect all - to unselect all selected alignments.
- Get sample sequence - not active in the current version.
- Copy - not active in the current version.
- The "Alignment>Comparison" command from the main menu;
-
The
 button on the toolbar.
- Main menu;
- Toolbar;
- Graphic navigation bar;
- Map;
- Information bar;
- Status bar.
- Imported genomes - calls out the "Compare genomes" dialog for starting genomes comparison
- Imported genomes with any sequence - calls out the "Compare genome with any sequence" dialog for starting genome to sequence comparison
- Any sequence - calls out the "Compare any sequence" dialog for starting two sequences comparison
-
"Dot matrix diagram" (
 button) - switches the main window map to display the sequences similarity matrix.
-
"Transparency" (
 button) - when enabled, the lines connecting similarity sites are transparent, otherwise these lines overlapped each other.
-
"Alignments" (
 button) - when enabled, the lines connecting similarity sites are visible.
-
"Draw selection mode" (
 button) - when enabled, the whole similarity site and lines connecting the selected block only are marked up, otherwise - the whole similarity site and lines connecting all blocks are marked up.
- Graphic view for alignment, or
- Diagram of alignment similarity matrix.
- Slide the map to the left or right without pressing any control keys.
- Scale the map smoothly by moving the mouse at hold "Shift" key. The scaling occurs from the map center. Moving the mouse to the right causes the map to zoom in, to the left - to zoom out. Releasing and pressing again the "Shift" key during the mouse movement causes the switching between map sliding mode and scaling one.
- Maximize the map zoom by clicking on homology site at hold "Ctrl" key.
- Select the certain map area with rectangle. To draw a rectangle, move the mouse at hold "Ctrl" key. The left and right rectangle borders mark an area that would be scaled out on mouse button release.
- The "Genomes 1" drop-down list allows to choose the first genome to compare.
- The "Genomes 2" drop-down list allows to choose the second genome to compare.
-
The "Chain" panels allow to choose the strands in selected genomes:
- Direct - forward (sense) strand;
- Reverse - backward (anti-sense) strand;
- Both - both strands.
- The "Search alignments" panel allows to specify the maximal allowed non-overlapping alignments number. The value is to be set in the "For" field.
- The "Genomes" drop-down list allows to choose the genome to compare.
- The "Sequence" field allows to input a sequence.
-
The "Chain" panels allow to choose the strands in selected genome and sequence:
- Direct - forward (sense) strand;
- Reverse - backward (anti-sense) strand;
- Both - both strands.
- The "Search alignments" panel allows to specify the maximal allowed non-overlapping alignments number. The value is to be set in the "For" field.
- The "Sequence 1" field allows to input the first sequence.
- The "Sequence 2" field allows to input second sequence.
-
The "Chain" panels allow to choose the strands in
selected sequences:
- Direct - forward (sense) strand;
- Reverse - backward (anti-sense) strand;
- Both - both strands.
- The "Search alignments" panel allows to specify the maximal allowed non-overlapping alignments number. The value is to be set in the "For" field.
- Using the "Advanced>Configuration" main menu command.
-
Using the
 toolbar button.
- The "Flanks" panel. The "Left flank" and "Right flank" panels allow to specify the loadable genome region with found feature or found alignment.
-
The "Loci options" panel.
- The "Multiple load" checkbox - not actine in this version.
- The "Max locus count to load" field allows to specify the maximal number of genomes to be loaded.
- The "Information view" panel. The "use HTML browser for information view" checkbox - When the box is checked out, the information is displayed in the same browser window where from the Java-applet was started, otherwise, the application's own windows are used.
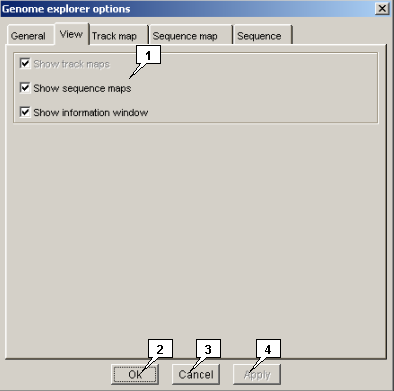
- The "Show track maps" checkbox - When the box is checked in, the maps for all loaded genomes are displayed, otherwise - not displayed (in the web version can not be checked out).
- The "Show sequence maps" checkbox - When the box is checked in, the sequence panels for all loaded genomes are displayed, otherwise - not displayed.
- The "Show information window" checkbox - When the box is checked in, the information window is displayed, otherwise - not displayed.
- The "Max layers count in compact mode" field allows to specify the maximal number of layers for a feature that can be visible in compact view mode.
- The "Max feature height" field allows to specify the height of a feature image (in pixels).
- The "Repaint on drag" checkbox - When the box is checked in, the map redrawing occurs simultaneously with dragging of the slider by mouse at hold right button (navigation by mouse case) or with moving of the mouse pointer at hold left button, otherwise - the redrawing occurs after mouse button releasing only.
- The "Show information on mouse over" checkbox - When the box is checked in, the information on a feature appears automatically in the information bar when the mouse pointer is located over this feature, otherwise - after clicking on a feature.
- The "Show navigation line" checkbox - When the box is checked in, the vertical line (line corresponding to current horizontal position) that moves in the map window synchronously with mouse pointer is visible, otherwise the line is not visible.
- The "Allow visual map navigation" checkbox [checked in by default] - When the box is checked in, the visual navigation in the map window by mouse is available.
- The "Show combined objects overlapping" checkbox - When the box is checked in, the overlapping features regions are shown in combined layer.
- Combined - to display combined layers only
- All - to display "regular" layers
- Combined+All - to display both combined and "regular" layers
- Compact mode - the mode restricts the maximal allowed number of displayed layers for every feature type to value set in the "Max layers count in compact mode" field on the "General properties" panel.
- Full mode - the mode allows all available layers for every feature type to be displayed.
- The "Recalculate range" mode. When this mode is chosen, the mark setting causes the map rescaling in the way, when feature image is in the center of map and takes the half of visible area (if possible).
- The "Current range" mode. When this mode is chosen, the mark setting does not cause the map rescaling.
- The "By layer" mode. When this mode is chosen, the arrow first shifts along the layer with selected feature. Once the last feature in layer is achieved, the arrow jumps to the first feature of the next layer, etc.
- The "By center position" mode. When this mode is chosen, the arrow jumps by all layers of selected feature type. The order of movement is determined by features centers coordinates.
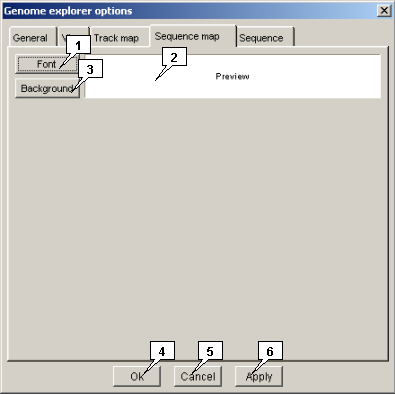
- The "Color" button allows to set panels background color. When pressed, calls out the "Color dialog" for color selection.
- The "Background" button allows to set the sequence fonts. When pressed, calls out the "Font" dialog for font selection.
- The "Preview" panel displays the selected font and color for sequence panel.
- The "Feature flanks" panel. The "Left" and "Right" fields allow to specify the lengths of left and right flanking sequences for the feature that was pointed at the moment of pop-up menu call.
- The "Sequence flanks" panel. The "Left" and "Right" fields allow to specify the lengths of left and right flanking sequences for the sequence that was pointed at the moment of pop-up menu call.
-
The "Numeration mode" panel.
The panel allows to set the sequences numeration style.
- Without numeration - no numeration would be applied;
- Left line numeration - numeration would be applied to the left of sequence string;
- Right line numeration - numeration would be applied to the right of sequence string;
- Interval numeration - numeration would be applied over each ten-letter block (over first, eleventh, twenty first etc. positions).
-
The "Sequence" panel.
The panel allows to set the sequence output style:
- The "Seq row length" field allows to specify the string length for output sequence. Set the value to zero to output sequence in a single string.
- The "Seq max length" field allows to specify the maximal length of output sequence.
- The "Autoclipping" checkbox - When the box is checked in, the output sequence is cut off for the length specified in the "Max length" field.
- The "Divide seq into blocks" checkbox - When the box is checked in, the sequence is output with gap after each ten-letters block.
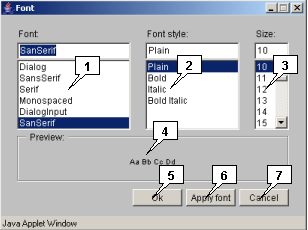
- The "Font" list allows to choose a font;
- The "Font style" list allows to choose a font style;
- The "Size" list allows to choose a font size;
- The "Preview" panel allows to preview the selected font;
- The "OK" button closes the window with applying the chosen parameters;
- The "Apply font" button allows to apply the chosen parameters without closing the window;
- The "Cancel" button closes the window without applying the chosen parameters.
- Basic colors set. Click on required color square to preview it on the appropriate panel. To confirm the choice, click the "OK" or "Apply" button.
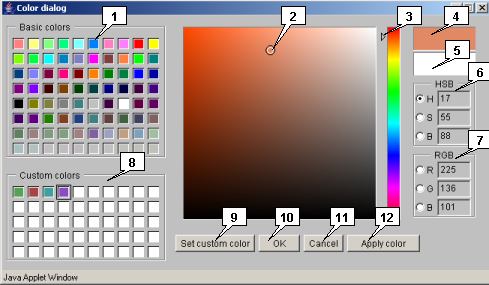
- Custom colors set. Click on required color square to preview it on the appropriate panel. To confirm the choice, click the "OK" or "Apply" button. User can change this set by clicking on a certain square with following selection of desired color. To choose the desired color, use the slider for rough color selection with following precise selection on the color palette, or use the HSB/RGB color sets. To add a selected color to the set, click the "Set Custom Color" button, and it will appear in chosen square as well as on the preview panel.
- Direct new color selection. To choose the desired color directly, use the slider for rough color selection with following precise selection on the color palette, or use the HSB/RGB color sets. To confirm selection, click the "OK" or "Apply" button.
Once the search is done, its results and parameters are saved.
The "Saved alignment" list contains ID's of previously saved searches. Selection of one of them causes the parameters of this search to appear in the window. The "Remove" button allows to remove a single search result from the list, the "Remove all" button - to remove all of them.
The "Current alignment" field allows to set the current alignment ID.
The "Loci" list allows to choose a locus for searching for alignment. The "Select all" and "Deselect all" buttons allow to select or unselect all loci.
The "Sequence" field is used for input of query sequence that is to be aligned to loci. The "Clear" button clears the field content.
The "Search alignment" panel allows to specify the limitations for number of alignments:
The "Sequence" panel allows to choose a type of sequence to be aligned:
The "Nucleotide specific" panel allows to check the following nucleotide sequence alignment options:
The "Join similar aminoacids to group" list allows to choose the appropriate variant of joining the similar aminoacids in one considerable symbol, e.g. the "YFW" value means that these aminoacids will be considered as the single one with averaged properties.
The "Max area covered by alignment on target" field allows to specify the maximal length of the locus region that could be covered by alignment.
The "Remove trailing X" checkbox allows to enable/disable the flanking poly-X sequences removal.
The "Program" panel allows to choose the search algorithm:
The "Chain" panel allows to select the search direction:
The "Similarity" panel allows to choose the similarity level:
The "OK" button serves for closing the window and performing the operation, the "Cancel" one - for closing the window without completing the selected operation.
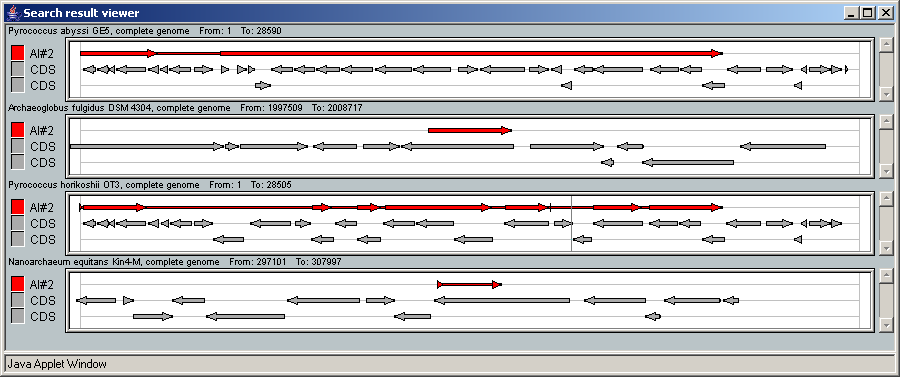
Once the search is done, the "Alignments" window with list of obtained alignments is appeared. In this window the data on either recently found alignment of alignments found earlier (they can be selected in the drop-down list above the list of obtained alignments) can be selected.
2.20.1. List of found alignments
- The "Alignments" dialog consists of:
2.21. Genomes comparison
-
The built-in "Genome comparison browser" tool for genomes comparison can be started by:
2.21.1. Main window
- The main window contains the following objects:
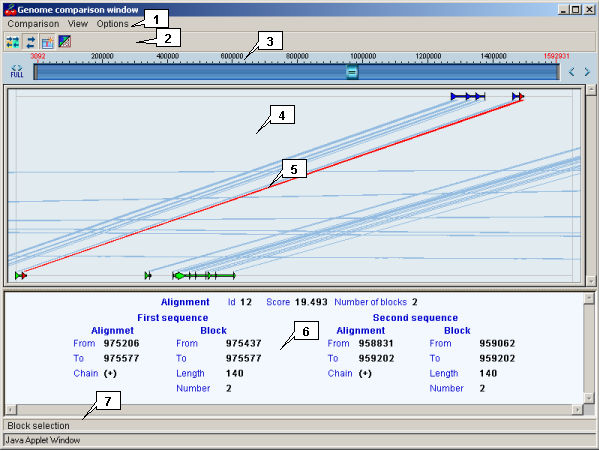
2.21.2. Main menu commands and toolbar buttons functionality
- The "Comparison" menu contains the following items:
- The "View" menu contains the following items:
- The "Options" menu contains the following items:
2.21.3. Graphic navigation bar
The Graphic navigation bar is the same as described here.
2.21.4. Map
The map provides a schematic visualization of loaded data and information on homology sites in convenient style for user. The map allows to change the image scaling and to explore the loaded region.
- The map may represent:
Switching between these modes is performed by the ![]() button on the toolbar, or by the "View->Dot matrix diagram" command from the main menu.
button on the toolbar, or by the "View->Dot matrix diagram" command from the main menu.
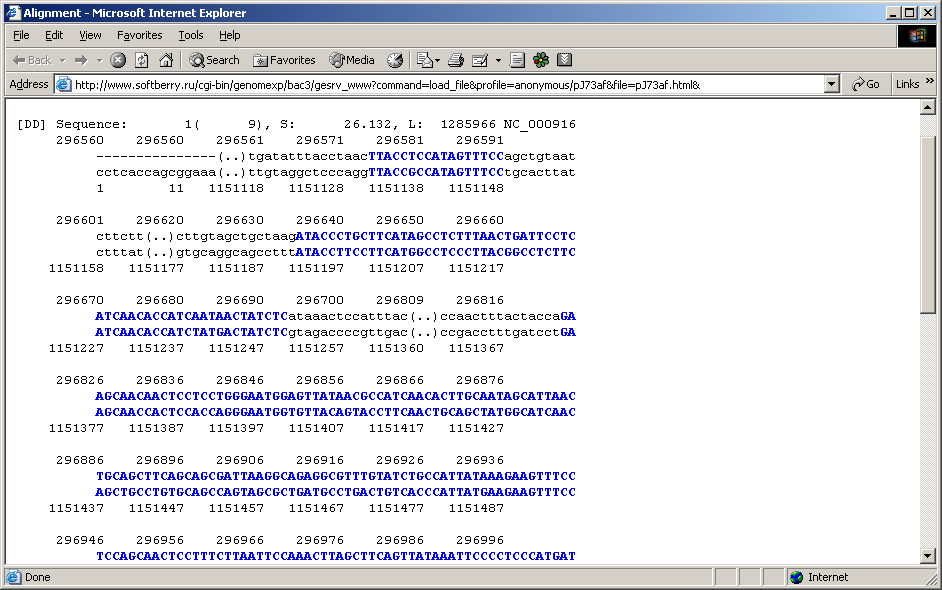
Mouse right clicking on a homology site causes the window with appropriate sequence to appear.
2.21.4.1. Graphical alignment representation
This mode switches the map to visualization of the alignment region only. Flanking sequence (genome) regions not included in alignment are not displayed.
On graphical representation, homology sites and their correspondence to each other on genomes are displayed in schematic manner. Various display modes are operated by the following main menu commands and toolbar buttons:
The ![]() button ("Opacity") - when pressed, the lines connecting aligned sequence blocks are transparent (is analogous to the "Options->Transparency" main menu command).
button ("Opacity") - when pressed, the lines connecting aligned sequence blocks are transparent (is analogous to the "Options->Transparency" main menu command).
The ![]() button ("Draw alignment") - when pressed, the lines connecting aligned sequence blocks are displayed (is analogous to the "Options->Alignments" main menu command).
button ("Draw alignment") - when pressed, the lines connecting aligned sequence blocks are displayed (is analogous to the "Options->Alignments" main menu command).
The ![]() button ("Block selection") - when pressed, the single block in homology site is selected, otherwise - all blocks are selected (is analogous to the "Options->Details selection mode" main menu command).
button ("Block selection") - when pressed, the single block in homology site is selected, otherwise - all blocks are selected (is analogous to the "Options->Details selection mode" main menu command).
While in this mode, the map can be navigated using either mouse or graphic navigation bar .
- Navigation by mouse allows to:
Note! The "Ctrl" key should be hold during all mouse operations from pressing to releasing the left button or otherwise the action would not be completed.
2.21.5. Information bar
The bar displays information on homology site and its block that is currently pointed on the map
2.21.6 Status bar
The status bar displays information on function of currently pointed toolbar button.
2.21.7 Selecting objects for comparison
2.21.7.1. Genomes comparison
The "Compare genomes" dialog for genomes comparing can be called out using the "Compare>Imported genomes" command from the main menu.
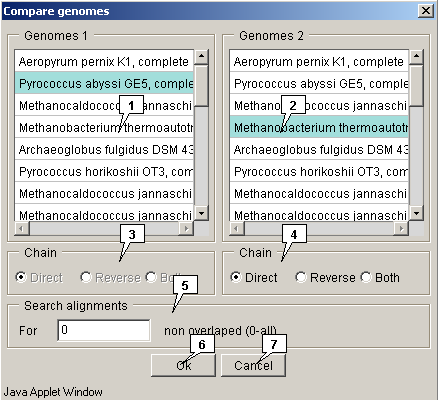
The "OK" button serves for closing the window and performing the operation, the "Cancel" one - for closing the window without completing the selected operation.
The results of aligning are displayed on the map.
2.21.7.2. Genome to sequence comparison
The "Compare genome with any sequence" dialog for comparing genome with a sequence can be called out using the "Compare>Imported genomes" command from the main menu.
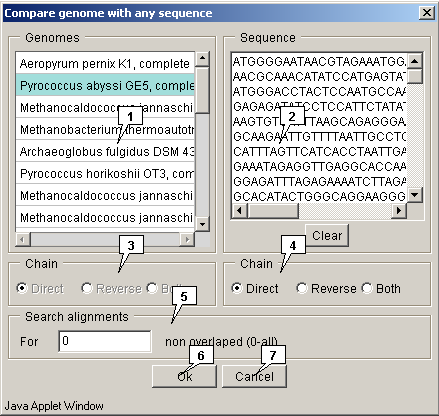
The "OK" button serves for closing the window and performing the operation, the "Cancel" one - for closing the window without completing the selected operation.
The results of aligning are displayed on the map.
2.21.7.3. Two sequences comparison
The "Compare any sequence" dialog for comparing comparing two sequences can be called out using the "Compare>Any sequence" command from the main menu.
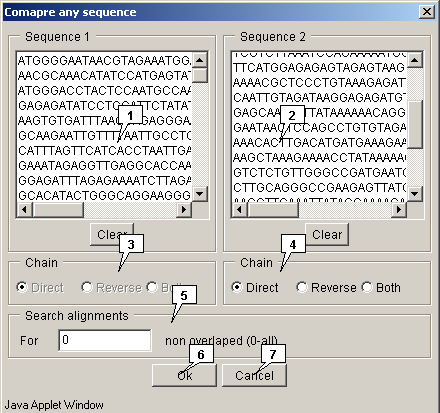
The "OK" button serves for closing the window and performing the operation, the "Cancel" one - for closing the window without completing the selected operation.
The results of aligning are displayed on the map.
Application parameters
-
The "Genome explorer options" dialog for setting up the application parameters can be called out by on of the following manner:
2.22.1. The "General" tab
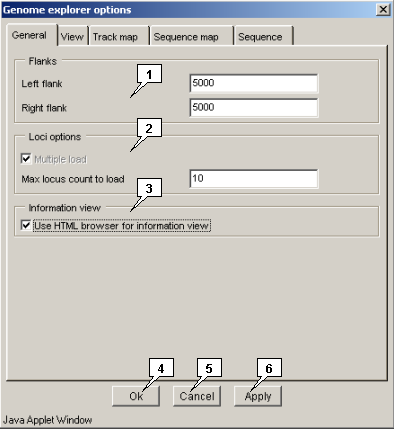
-
The "General" tab allows to set the common parameters:
2.22.2. The "View" tab
-
The "View" tab allows to set the visualization parameters:
2.22.3. The "Track map" tab
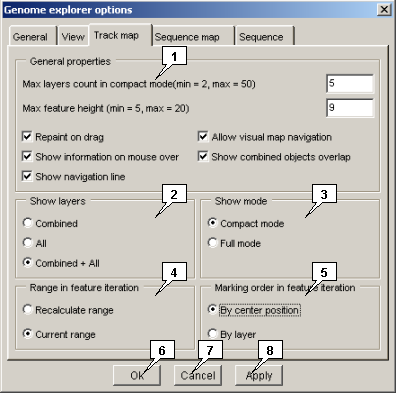
The "Track map" tab allows to set the maps visualization parameters:
-
The "General properties" panel
-
The "Show layers" panel
-
The "Show mode" panel. The panel allows to choose the visualization mode:
-
The "Range in feature iteration" panel. The panel allows to choose the marking arrow movement mode:
-
The "Marking order in feature iteration" panel. The panel allows to choose the marking arrow movement order:
2.22.4. The "Sequence map" tab
-
The "Sequence map" tab allows to set sequences panels visualization parameters.
2.22.5. The "Sequence" tab
-
The "Sequence" tab allows to set sequences output parameters.
Note! If a feature/sequence is located in the beginning or end of a chromosome, the length of one of flanks is equal to zero.
2.23. Font selection dialog
-
The "Font" dialog allows to set the font output parameters.
2.24. Color selection dialog
-
The "Color dialog" window allows to set the color parameters. The required color can be set by several means:
To roll back the previous color, click on previous color preview panel, and then click on the "OK" or "Apply" button.
The "OK" button closes the window with applying the chosen parameters, the "Cancel" button closes the window without applying the chosen parameters, and the "Apply color" button allows to apply the chosen parameters without closing the window.